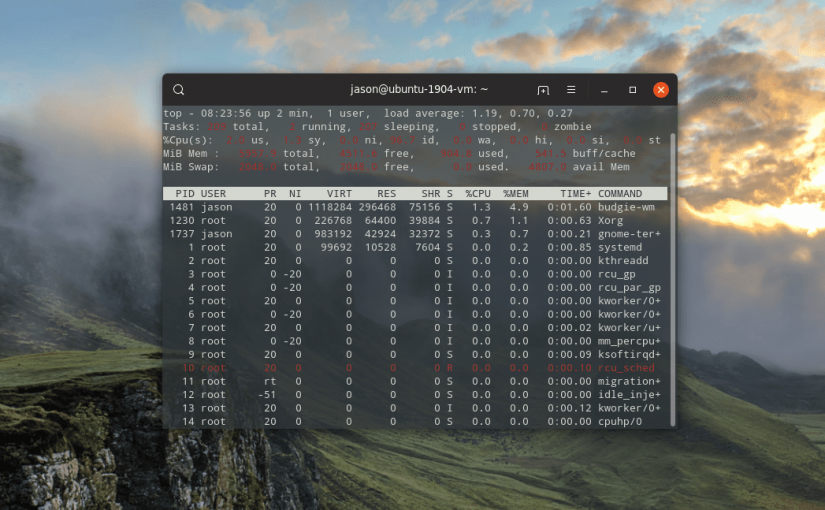
The Linux top command provides a terminal task manager which lists all of the running processes on the computer.
top
I use “Top” to kill a process within the top interface simply press k and enter the process id next to the application you wish to close. Top solicits a specific signal to send; in most cases, enter 15 (to request the process to gracefully terminate) or 9 (to immediately kill the process).
The first line offers some basic high-level info about the system:
- The time
- How long the computer has been running
- Number of users
- Load average
The load average shows the system load time for the last 1, 5 and 15 minutes.
The second line summarizes the number of ongoing, concurrent tasks:
- Total number of tasks
- Number of running tasks
- Number of sleeping tasks
- Number of stopped tasks
- Number of zombie tasks
The third line summarizes CPU performance:
- usage by the user
- usage by system
- usage by low priority processes
- usage by idle processes
- usage by io wait
- usage by hardware interrupts
- usage by software interrupts
- usage by steal time
The fourth line emphasizes memory:
- Total system memory
- Free memory
- Memory used
- Buffer cache
The fifth line highlights available swap space and total memory inclusive of swap:
- Total swap available
- Total swap free
- Total swap used
- Available memory
Main Table
The main table lists running processes:
- Process ID
- User
- Priority
- Nice level
- Virtual memory used by process
- Resident memory used by a process
- Shareable memory
- CPU used by process as a percentage
- Memory used by process as a percentage
- Time process has been running
- Command
Key Switches For the ‘top’ Command
Although you invoke top just by typing the name in a shell session, a few switches modify the utility’s behavior:
- -h: Show the current version
- -c: This toggles the command column between showing command and program name
- -d: Specify the delay time between refreshing the screen
- -o: Sorts by the named field
- -p: Only show processes with specified process IDs
- -u: Show only processes by the specified user
- -i: Do not show idle tasks


